Efficient Time Tracking through Clock In/Out in SAP SuccessFactors
SAP SuccessFactors Time Tracking is a module that helps organizations manage employees’ working hours, overtime, absences, and time-off requests efficiently.
SAP SuccessFactors Time Tracking is an advanced solution that companies need to purchase separately. It offers more features than the basic Employee Central Time Sheet and includes Clock In Clock Out (CICO) for automatic time recording from swipe machines or biometric devices.
The feature is seamlessly integrated with the existing SAP SuccessFactors Time Sheet processes.
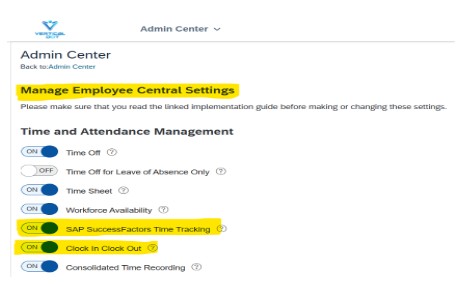
Initial Setup – Provisioning The following settings need to be enabled in provisioning
Enable SAP SuccessFactors Time Tracking
Enable Clock in Clock Out
Check Manage Employee Central Settings in Admin Center to see if Clock In Clock Out and Time Tracking are enabled.
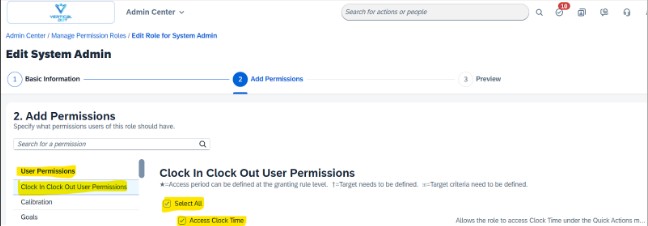
Setting Up Role-Based Permissions for Clock In Clock Out (CICO)
To configure Clock In Clock Out (CICO) in SAP SuccessFactors Time Tracking, you must set up Role-Based Permissions (RBP) for different roles (Admins, Employees, and Managers) based on business needs.
User Permission forClock In Clock Out (CICO)
1. Clock In Clock Out User Permissions -> Access Clock Time (Allows you to access Clock Time from the Quick Actions menu on the latest home page.
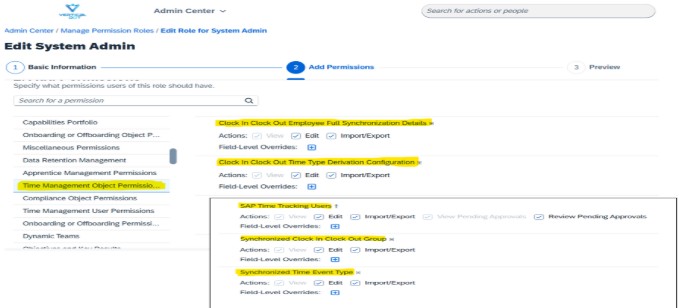
2. Time Management Object Permissions:
Clock In Clock Out Employee Full Synchronization Details – (View / Edit / Import Access)
Clock In Clock Out Time Type Derivation Config – (View / Edit / Import Access)
Synchronized Clock In Clock Out Group – (View Only)
Synchronized Time Event Type – (View Only)
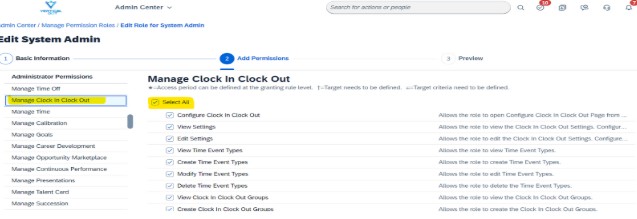
Administrator Permissions for Clock In Clock Out (CICO)
✅Configure Clock In Clock Out – Access configuration
✅View/Edit Settings – Modify CICO settings in Admin Center
✅Create Time Event Types – Add Time Event Types in Admin Center
✅Create Manual Time Events – Manually add time events in Manage CICO or Time Sheet.
Enable Job Info for Clock In Clock Out Group
Activate Clock In Clock Out Group in BCUI (JobInfo)
Grant Edit/Insert Access under Employee Central Effective Dated Entities
Once this is done, you can navigate to Admin Center -> Configure Clock In Clock Out.
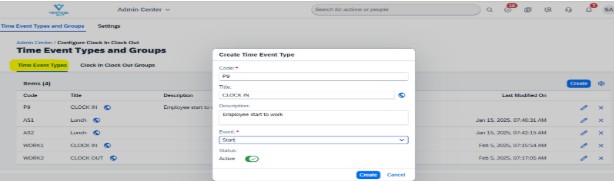
Create Time Event Types
On the first tab, you can maintain the Time Event Types. Here you need to enter the Code, the Event, and the Status. The Title and Description are optional fields.
In the following example, the typical Clock In Time Event Type is created.
Note:The code of the Time Event Type must be used by the terminal and the 3rd party integration using the REST API in field typeCode. See example in section Supported Sources to Record a Time Event.
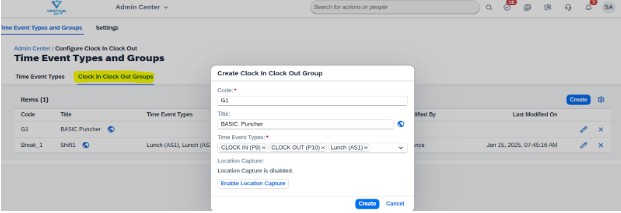
Create Clock In Clock Out Groups
Maintain Clock In Clock Out Groups by entering a Code, assigning Time Event Types, and optionally adding a Title to define allowed time events. In the following example, a Clock In Clock Out Group is created in which the Clock In, Break and Clock Out is allowed.
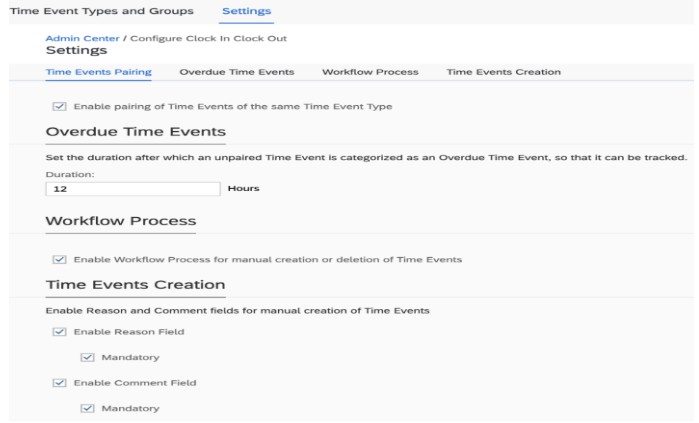
Maintain Clock In Clock Out Settings
In the settings page you can configure the behavior and switch on/off features of Clock In Clock Out.
1.Time Events Pairing If enabled, the system pairs consecutive Time Events of the same type; if disabled, unpaired events show an error. 2. Overdue Time Events This setting highlights unpaired Time Events after 12 hours, but only for Start Time Event Types. Stop Time Events show an error immediately if unpaired. 3.Workflow Processes Enabling this flag triggers workflows when a Manual Time Event is created or deleted. 4.Time Events Creation
This setting controls the display and mandatory status of Reason and Comment fields during manual Time Event creation.
Assign Employees to Clock In Clock OutGroups:
Only employees who are assigned to a Clock In Clock Out Group can record Time Events.
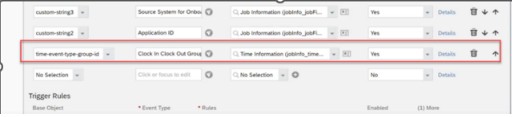
For this, a new field “time-event-group-id” is available in the Job Information which needs to be enabled in Admin Center -> Manage Business Configuration
2. As a second step, this field needs to be made accessible via permissions in Admin Center -> Manage Permission Roles -> Employee Central Effective Dated Entities -> Job information
Once this is done you can assign employees to Clock In Clock Out Groups via New Hire, MSS or Import.
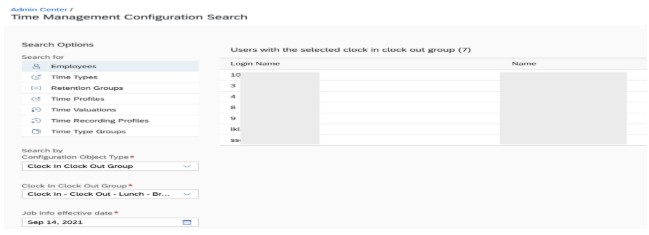
Note: Only employees which have a Time Recording Variant = Clock Times and a Time Recording Profile with Time Recording Method = Positive can be assigned to a Clock In Clock Out Group. You can use the Admin Center –> Time Management Configuration Search to see all employees assigned to a specific Clock In Clock Out group on a specific date.
Synchronize Clock In Clock Out Employees
Employees in a Clock In Clock Out Group are replicated when changes occur in their Job Information. In certain situations, a full fresh replication may be required. This can be triggered with the MDF object Clock In Clock Out Employee Full Synchronization Details. To enable access, the corresponding permission to the object via Admin Center -> Manage Permission Roles -> Time Management Object Permission needs to be granted. With the field Trigger Full Synchronization, the full sync can be triggered. After the sync has finished, the details can be found in the read-only fields.